What is this for?
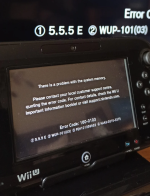
If you are encountering Error Code 160-0103 "There is a Problem with the system memory" or your Wii U is freezing at bootup or during Factory Reset it is likely that the eMMC Chip is failing.
This tutorial goes into fixing this Error 160-0103, by using the SD card in the front slot as replacement for the failing eMMC.
In this tutorial we will rebuild the MLC, which means it is empty, whithout your data. In the end I show how to salvage savegames from the failing eMMC.
Please note there are other possible causes for the 160-0103 error (like a CBHC brick). Also there are other possible solutions to this problem. To see if this Tutorial is right for you, check out the Ultimate Wii U Troubleshooting Guide
What this will do
We will first install ISFShax, which is an early exploit that runs before the operating system loads. This allows us to patch the OS to redirects the reads and writes, that normally go to the eMMC, to a partition on the SD card. So you will need to have the SD card in the Wii U to use it, as that is now it's new internal memory.
Also you need to keep the standby servcies (and with that the Quickstart menu) disabled as they don't work with ISFShax. (Your Wii U will hang once you turn it off till you remove power if standby services are enabled).
In this tutorial we are only redirecting the MLC. If you plan to try some dangerous things in the future, you can still mess you your system SLC and SLCCMPT. If you want to use this for such experiments consider using full redNAND, where all 3 devices get redirected.
Update
28.01.2024 - Wii VC games (from he eShop or VC Injects) now works from the redNAND internal memory. Keep in mind that Wii VC is more picky about the SD card. So far Sandisk cards worked for me, but Samsung cards didn't. If the card is incompatible, it will hang on a black screen after the silver Wii logo.
Choosing an SD card
I highly recommend to use an SD card, which is designed to sustain lots of writes, like Sandisk Max Endurance or at least High Endurance or Samsung Endurance. The absolute minimum size is 8GB using, 1,5GB for the FAT32 partition and the rest for the MLC partition, but it is recommend for the the card should have at least 16GB, so you can have at least 8GB for the MLC partition. The Maximum size of SD you can use is 2TB.
Since the Wii U Discs suffering from Disc rot and also for convenience, you probably want to dump all your Game Discs and install the Games from these Dumps You find detailed instructions on how to do that here: https://wiiu.hacks.guide/#/dump-games (do it after you completed this guide)
Later in that guidel you will create a second partition, which replaces the Internal Memory. You won't be able to resize that partition, without rebuilding again, so you better size everythng properly the first time.
The first partition is where all the Homebrew goes to and also where the dumps of the Wii U games go to. So this partition needs to have at least enough space to store your largest Wii U game with some extra space. If you want to use a USB Loader with vWii, you can also store the (OG) Wii games on the FAT32 partition.
The second partition (the MLC partition, which you format initally with NTFS) is where you install all your Wii U games (eShop and dumped Disc games, updates, DLC, saves...) to, including the VC Injectes. Also 5GB are used up by the Wii U system.
Make sure the the SD card can fi both these partitions.
Installing ISFShax
For installing ISFShax follow this tutorial: https://gameparadise.org/tutorials/how-to-set-up-isfshax.177/ but skip the "Autoboot" part for now.
Optional: Backing up savegames
If your Wii U can still run Tiramisu or Aroma: https://wiiu.hacks.guide/#/ you can use SaveMii to back up your save games.
If it can't you then you probably already used UDPIH to install ISFShax. Launch the recovery again using UDPIH and then use the Dump SLC + MLC option. Your SD card needs to have at least 64GB for that (for a 32GB console). You then need to merge mlc.bin.part files in the right order and can then extract the savegames using wfs-extract.
TODO: add more details
If you lost the password to your NNID and can't recover it because the email doesn't exist anymore, you can transfer it. This is only a last resort option. If you still have the email address, it would be better to use the "Forgot Password" option now, as you won't have it on the new system.
There is also the option to use a password reset option on the PC. For that you need to create a Nintendo Account and then link the NNID to it. When linking it will ask for the password and give a reset option using the email.
Keep in mind this transfer only works on the same console and only if you don't do a Factory Reset.
To transfer the NNID It's enough to copy the account.dat file over.
You can use ftpiiu everywhere to save it to the PC for now. Just copy the whole /storage_mlc/usr/save/system/act/ folder to the PC. In that folder you find one subfolder for each user and in that subfolder you find an account.dat (it's a plain text file, you can open it with notepad). The folders are numbered in the order the users were created.
On the new rebuild mlc the numbering will start again with 80000001. If the user with the NNID had a larger number just create new users on the new system until you reach that number. Then you can copy the account.dat back and reboot.
After that you should be able to access the eShop and download the games again.
Partitioning the SD card
On Windows you need to use a third party tool like Minitool Partition Wizard or easeus, on Linux you can use gparted.
You need to have two primary partitions on the card:
- FAT32 - (in gparted set lba flag). This is what the PC will see and all your homebrew goes
- NTFS - This partition will be the MLC replacement, it should have at least 8GB. (don't assign a drive letter)
Configuring redNAND
Create a file
minute/rednand.inion the sdcard with the following content:
Code:
[partitions]
slccmpt=false
slc=false
mlc=true

[scfm]
disable=true
allow_sys=false
Rebuilding the MLC
- Download all the mlc system titles for your region from NUS. This can be done conveniently with MLCRestorerDownloader by @Xpl0itU. To use the MLCRestoreDownloader, you need to extract it and then copy the otp.bin from the SD card to it's directory. Then start the Downloader and select mlc and then your consoles region.
You will get the
output/MLC/{region}
directory, which contains a directory for each title. In total there should be 52 titles totaling ~1.1GiB.
If your console has an older firmware it might also be necessary to get the latest SLC titles.
- On the root of your SD card create a folder wafel_install. Then copy all 52 titles to the wafel_install folder, so it now contains the 52 subfolders, one for each title. If you want to reinstall / update SLC titles, you would also put them there.
- Put the wafel_setup_mlc.ipx on the SD card in
/wiiu/ios_plugins
.
- Select
Patch (sd) and Boot ios redNAND
in minute to start the setup of your fresh MLC.
During the setup you won't see anything on the screen. You have to go by the power led.
The power LED will flash blue, while it is installing the titles.
if something goes wrong the LED will turn orange, but it will continue as long as it is blinking.
The LED will become static once it finished. You can now power off the console.
If the led is blinking red, something fatal happend. Ask for help.
During the setup a short log gets written to the SD:
wafel_setup_mlc.log
.
In the end it will enable the inital setup on the next boot.
- Remove the
wafel_setup_mlc.ipx
from
/wiiu/ios_plugins
on the SD.
- Select
Patch (sd) and Boot ios redNAND
again. If everything worked, the initial setup should launch.
- Follow through with the initial setup. After the "settings" part of the setup, it will drop you back into minute, just select
Patch (sd) and Boot redNAND
again.
Setting up autoboot
To automatically boot into redNAND create the file
sd:/minute/minute.iniwith the following content:
Code:
[boot]
autoboot=2
autoboot_timeout=1
Installing minute to SLC
If you haven't already installed minute (fw.img) to the SLC, you should do that now so In case the SD get's lost the Wii U displays at least the minute menu. Follow the "Booting without SD" section from the ISFShax tutorial for that. You only need to install the fw.img and can skip the ios_plugins part as you probably don't want to to boot the eMMC anyway.